Category: Gear | Type: Guide | Focus: Backpacking Stoves | Time: 9 m
Last updated: April 2025
Introduction: Why Your Stove Choice Can Make or Break a Trip
A backpacking stove seems like a small piece of gear—until it doesn’t work when you need hot food or water. Whether you’re thru-hiking, car camping, or prepping for alpine routes, your stove choice affects not only your meals, but fuel weight, boil time, reliability, and even your safety.
This guide will help you choose the right backpacking stove based on trip type, climate, weight goals, and cooking style. We’ll break down the main portable cooking gear options, compare pros and cons, and explain what real hikers say about each model.
Quick Comparison Table: Backpacking Stove Types
| Stove Type | Fuel Type | Boil Time (1L) | Avg. Weight | Best Use Case | Price Range |
|---|---|---|---|---|---|
| Canister (upright) | Isobutane/propane | ~3-5 mins | 2-4 oz | All-around, 3-season use | $30-70 |
| Integrated System | Isobutane | ~2.5-4.5 mins | 12-16 oz | Fast boiling, cold-weather meals | $80-150 |
| Alcohol Stove | Denatured alcohol | ~7-10 mins | 1-2 oz | Ultralight hikers, DIY setups | $15-40 |
| Solid Fuel | Esbit tabs | ~8-12 mins | <1 oz | Emergency or minimalist cooking | $10-30 |
| Liquid Fuel | White gas | ~4-6 mins | 11-15 oz | High-altitude, sub-zero expeditions | $80-170 |
| Wood-Burning | Twigs/sticks | ~6-10 mins | 5-9 oz | Bushcraft, off-grid cooking | $40-100 |
Detailed Guide to Lightweight Hiking Stove Options
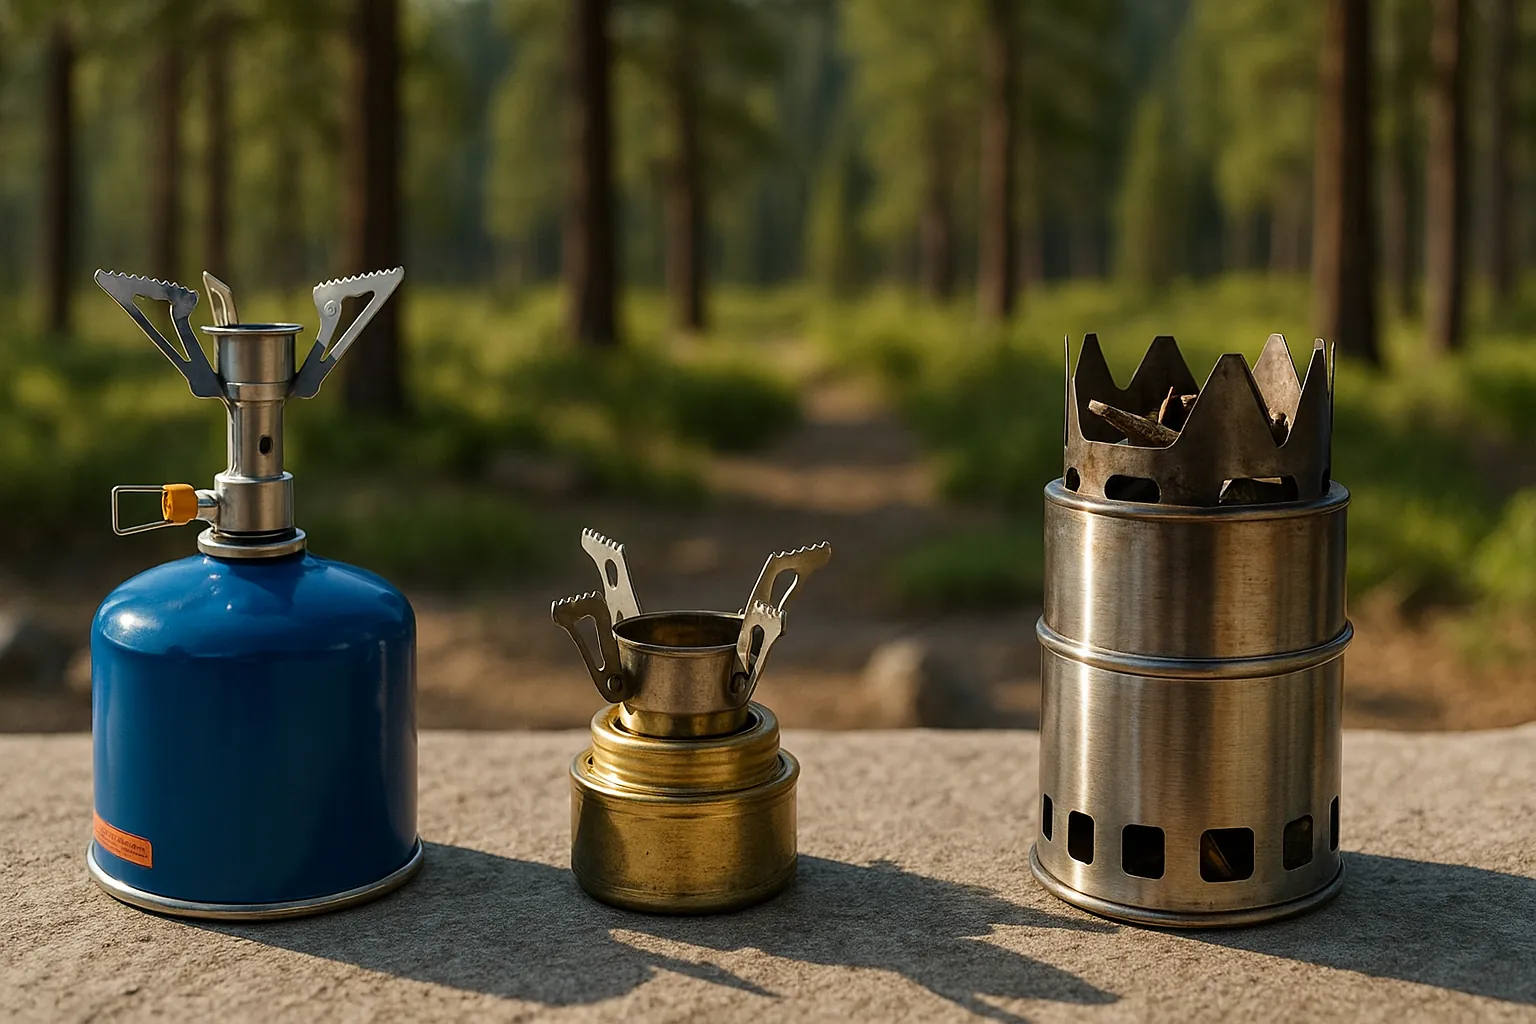
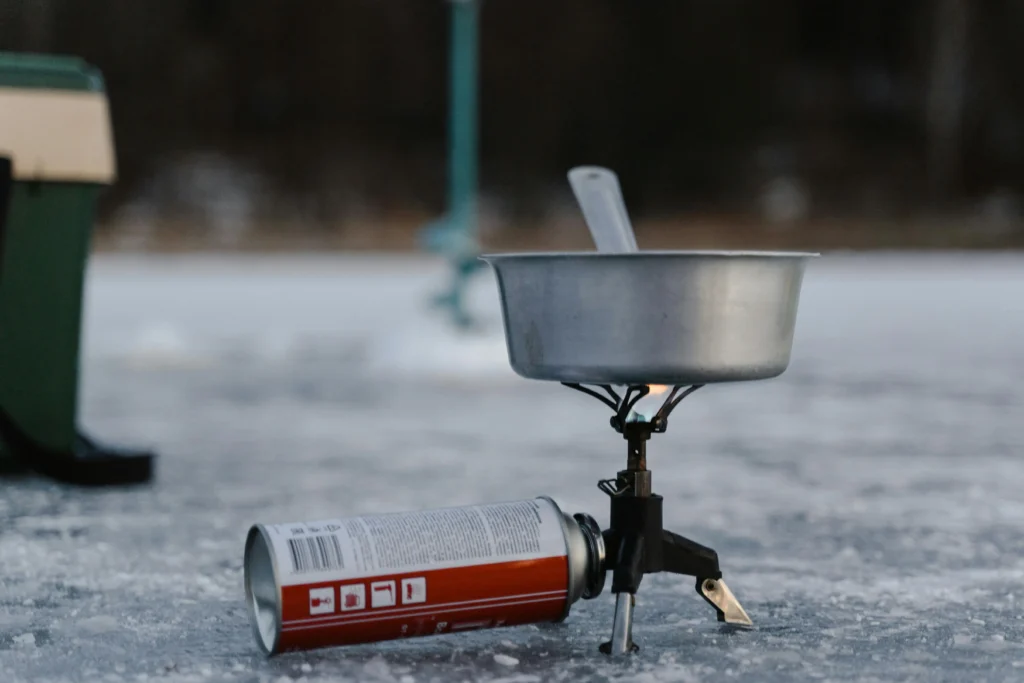
1. Canister Stoves (Upright)
These are the most common backpacking stoves—and for good reason. They screw directly onto isobutane canisters, light fast, and boil water quickly. When considering how to choose a backpacking stove for thru-hiking, these models often strike an ideal balance of weight and convenience.
Pros:
- Lightweight and compact (fits in a mug)
- Easy to use with push-button ignition
- Clean-burning with no soot
- Great for short to medium trips
- Some models offer basic simmer control for backpacking, though not as precise as liquid fuel stoves
Cons:
- Struggles in sub-freezing temps
- Canisters can be hard to find internationally
- Less efficient in windy conditions without windscreen
- Canister disposal/recycling can be challenging
Fuel efficiency: A typical 8oz canister provides 10–14 boils of 0.5L water, depending on conditions.
Best for: beginner to intermediate hikers in spring through fall, weekend warriors seeking reliable performance
Popular examples: MSR PocketRocket 2, Soto Amicus, Snow Peak LiteMax
“After testing dozens of stoves, I find upright canister models offer the best balance of weight, convenience, and reliability for most 3-season backpackers.” — Backpacker Magazine Field Test
Looking for a specific recommendation? Check out our guide to Best Portable Campfire Grills for Cooking Outdoors (2025 Guide) for more cooking options to pair with your stove.
2. Integrated Canister Systems (e.g., Jetboil)
These all-in-one systems combine burner + pot + heat exchanger for super-fast boil times. They’re heavier, but incredibly efficient. For cold-weather stove performance, these systems excel where standard canister stoves struggle.
Pros:
- Boils water in under 3 minutes
- Wind-resistant design improves fuel efficiency in stoves
- Easy to use and clean
- Stable and efficient in cold and wind
Cons:
- Heavier than standard stoves
- Bulkier in pack
- Poor simmer control
- Limited pot compatibility
Fuel efficiency: Up to 4–5L of water boiled per 100g canister—nearly 25% more efficient than standard canister stoves
Best for: cold-weather hikers, those who prioritize fast meals or melting snow, groups sharing cooking duties
Popular models: Jetboil Flash, MSR WindBurner, Jetboil MiniMo
If you frequently hike in cold conditions, you might also be interested in our Best Rain Jackets for Backpacking guide to stay warm and dry.
3. Alcohol Stoves
Loved by ultralighters and DIY fans, alcohol stoves are simple, lightweight, and silent. They run on denatured alcohol, HEET, or ethanol, making them a favorite among the ultralight cooking gear community. If you’re wondering how to save weight with a backpacking stove, this is your answer.
Pros:
- Extremely light and packable
- Fuel easy to find at gas stations and supermarkets
- Silent operation
- No pressurized parts
- Great denatured alcohol stove guide resources available online
Cons:
- Slow boil times
- Poor in wind and cold
- No simmer or flame control
- More fragile (especially homemade designs)
- Invisible flame can be a safety hazard
Fuel efficiency: Approximately 1oz of alcohol boils 2 cups of water
Best for: thru-hikers, weight-cutters, and those with patience
Popular styles: Trangia Spirit Burner, DIY soda can stove, Trail Designs Caldera Cone
For a complete lightweight setup, pair your alcohol stove with items from our Top 7 Camping Tools Under 100g That Serious Backpackers Swear By list.
4. Solid Fuel Stoves
Solid fuel tablets (like Esbit tabs for camping) are ultra-compact and light, often used in survival kits or minimal loadouts. For emergency backpacking kits, these stoves provide reliable heat with minimal space requirements.
Pros:
- Tiny and ultralight
- No moving parts
- Good for emergency kits
- Relatively odorless fuel while burning
- Indefinite shelf life for fuel tablets
Cons:
- Longest boil time
- Leaves residue on pots
- Limited cooking power
- Tablets can be expensive over time
- Inconsistent flame in windy conditions
Fuel efficiency: One 14g tablet typically boils 500ml of water
Best for: backup systems, emergency use, or ultralight minimalists
Popular models: Esbit Pocket Stove, Vargo Hexagon Wood Stove (when used with solid fuel)
5. Liquid Fuel Stoves
These burn white gas (and sometimes kerosene or gasoline) and are a favorite for extreme conditions and international travel. For high-altitude stove reliability, liquid fuel models are often the only dependable option.
Pros:
- Works in extreme cold or high elevation
- Fuel is refillable and available globally
- Good for group cooking and simmering
- Reliable in any weather
- Excellent white gas stove performance in challenging conditions
Cons:
- Heavy and bulky
- Needs priming and cleaning
- Strong fuel odor
- Louder than other options
- Steeper learning curve
Fuel efficiency: About 20 boils per 20oz of white gas
Best for: alpine expeditions, winter trips, and off-grid remote travel
Popular models: MSR WhisperLite International, Primus OmniFuel, MSR DragonFly
For more gear that performs well in extreme conditions, see our Best Odor-Proof Bags for Backpacking: Keep Smells In & Critters Out (2025) guide.
6. Wood-Burning Stoves
These burn twigs and branches, meaning no need to carry fuel—but they require dry wood and patience. For bushcraft cooking setup enthusiasts, these provide a satisfying and sustainable option.
Pros:
- No fuel weight
- Renewable and off-grid
- Great for long treks with consistent wood supply
- Can be used as campfire alternative
- Many wood-burning stove tips available from bushcraft community
Cons:
- Not allowed during fire bans
- Needs constant tending
- Not suitable above tree line
- Leaves soot on cookware
- Requires dry fuel source
Fuel efficiency: Unlimited (as long as dry wood is available)
Best for: bushcrafters, long-haul backpackers, and off-grid travelers
Popular models: Solo Stove Lite, Vargo Hexagon, BioLite CampStove
For additional off-grid camping techniques, you might find our How to Pack a Backpack: The Ultimate Guide for Hikers & Campers (2025) helpful.
How to Choose the Best Backpacking Stove for Your Needs
Trip Type & Duration
Weekend Backpacking (Spring-Fall) Go for a canister stove like the Soto Amicus or MSR PocketRocket 2. Light, fast, easy—perfect for lightweight stove for hiking enthusiasts who value simplicity.
Alpine or Snow Camping Choose a liquid fuel stove or an integrated system like the MSR WindBurner. When selecting a stove for melting snow on winter trips, fuel efficiency becomes critical.
Ultralight or Thru-Hiking Consider an alcohol stove (like Trangia) or a solid fuel setup as a backup. Many experienced hikers compare canister stove vs alcohol stove for thru-hiking and find alcohol wins for weight but canister for convenience.
Bushcraft and Long Trips with Resupply Try a wood-burning stove like Solo Stove or Toaks. These shine when you can gather fuel along the way.
International Travel Use a liquid fuel stove that can run on multiple fuels. This makes it easier to find compatible fuel sources globally.
Cooking Style & Climate
| Cooking Style | Recommended Stove Type | Reasoning |
|---|---|---|
| Boil-only (freeze-dried meals) | Integrated System | Fastest boil times, fuel efficient |
| Simmering & Cooking | Canister or Liquid Fuel | Better flame control |
| Ultralight Minimalist | Alcohol or Solid Fuel | Lightest weight option |
| Winter Conditions | Liquid Fuel or Integrated | Better cold-weather performance |
| High Altitude (>10,000ft) | Liquid Fuel | Maintains pressure at altitude |
Weight Considerations
For those looking to minimize their pack weight, here’s a comparison of typical complete cook systems (stove + pot + fuel for a weekend):
- Ultralight system: Alcohol stove + titanium pot + fuel (5-7oz total)
- Lightweight system: Canister stove + aluminum pot + small canister (12-16oz total)
- Integrated system: Jetboil or similar (16-20oz total)
- Expedition system: Liquid fuel stove + aluminum pot + fuel bottle (20-28oz total)
Real User Experiences: What Experienced Hikers Say
Experienced backpackers frequently offer insights that go beyond specifications:
- Thru-hikers often switch to alcohol or solid fuel after week one to save ounces. As one Appalachian Trail hiker noted: “The extra 10 minutes of cook time was worth saving 8oz in my pack over 2,000 miles.”
- Cold-weather campers consistently praise integrated systems: “My Jetboil still worked at 15°F when my friend’s standard canister stove failed completely.”
- Minimalists report using wood stoves successfully on long trails like the CDT—when fire bans permit. One hiker reported: “I carried just 9oz of cooking gear and never ran out of fuel on a 3-week section.”
- Beginners frequently appreciate the no-hassle setup of upright canister stoves: “I can be cooking within 30 seconds of stopping, which matters when I’m tired.”
Stove Safety & Maintenance Tips
Safety First
- Always cook in ventilated areas – Carbon monoxide is a risk with all stoves
- Keep fuel canisters away from heat sources – They can explode if overheated
- Never cook inside your tent – Fire and carbon monoxide risks
- Test new stoves at home first – Learn their quirks before heading out
- Carry a backup ignition source – Lighters can fail
Maintenance for Longevity
- Clean after each trip – Especially important for liquid fuel stoves
- Check O-rings and seals – Replace if cracked or damaged
- Store properly – Keep in dry place, separate from fuel
- Test periodically – Don’t discover issues on the trail
- Keep spare parts – Jets, seals, and cleaning tools for longer trips
Conclusion: The Right Stove Saves Time, Weight, and Sanity
Choosing the right backpacking stove is about matching your style, trip, and priorities. Want simplicity? Go canister. Want warmth above 10,000 ft? Go liquid fuel. Want gram savings? Go alcohol or solid fuel.
Take time to assess how you eat, where you camp, and what you’re willing to carry. Your stove might be the smallest item in your pack—but it’s also the one that delivers hot meals and morale when you need them most.
For a complete backcountry kitchen setup, consider pairing your new stove with items from our Best Campfire Grill Grates for Backpacking: Lightweight Options for Open-Flame Cooking (2025) guide.
FAQ: Choosing a Backpacking Stove
Q1: What’s the lightest backpacking stove setup?
Alcohol stoves and solid fuel tabs typically weigh under 2 oz total. The lightest complete cook system (stove, pot, fuel for weekend) weighs about 5oz.
Q2: Can I take a fuel canister on a plane?
No. But you can fly with the stove itself and buy fuel after arrival. Many hikers mail fuel ahead to accommodation near trailheads.
Q3: Are integrated stoves worth the price?
If you prioritize speed, wind performance, or cold weather use—yes. The fuel efficiency can save money over time, making the $100+ investment reasonable for frequent hikers.
Q4: Can I cook real meals on an alcohol stove?
Yes, but it takes time and practice. Simpler meals = better results. For elaborate cooking, consider a stove with simmer control.
Q5: What stove works best at high altitude?
Liquid fuel stoves handle altitude and cold better than canister models. Above 10,000 feet, canister pressure drops significantly, while liquid fuel maintains performance.
Q6: How do I choose a stove for high-altitude hiking?
Look for liquid fuel stoves specifically rated for alpine conditions. Models like the MSR WhisperLite International maintain performance where canister stoves falter.
Q7: Is a Jetboil worth it for weekend backpacking?
For most weekend backpackers, a standard canister stove offers better versatility at lower weight. Save the Jetboil for trips where boiling speed and efficiency matter most.
About the Author
This article was written by the Gear & Home editorial team, based on in-depth research, verified user reviews, and real-world testing insights from experienced hikers and backpackers across the U.S.
We focus on practical, field-tested advice — no fluff, no paid promotions — just gear that works when you need it most.