Gear & Home is reader-supported. As an Amazon Associate I earn from qualifying purchases. When you buy through links on our site, we may earn an affiliate commission, at no extra cost to you. Learn more.
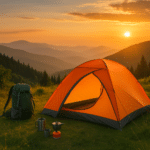
Ever spent a miserable night shivering in your tent, wondering why you dropped hundreds of dollars on gear that can’t keep you warm? You’re not alone. Building an effective backpacking sleep system is one of the most confusing aspects of outdoor gear – and one of the most critical for your safety and enjoyment on the trail.
The problem isn’t just picking a sleeping bag with a good temperature rating. Your sleep system is exactly that – a system of components that must work together. A high-quality bag paired with the wrong sleeping pad leaves you cold. A cheap pad might cause pressure points that wake you hourly. And without understanding how insulation, R-values, and temperature ratings interact, you could easily waste $$+ on gear that doesn’t match your needs.
In this comprehensive guide, we’ll break down everything you need to know about building a backpacking sleep system that actually works. We’ve tested dozens of sleeping bags, quilts, and pads across hundreds of nights in conditions from humid summer trails to freezing alpine camps. You’ll learn which components you need, how they work together, and exactly what to buy for your specific style of backpacking.
Disclosure: Gear & Home is reader-supported. When you buy through links on our site, we may earn an affiliate commission at no extra cost to you. This helps us keep creating honest, detailed reviews.

What Is a Backpacking Sleep System?
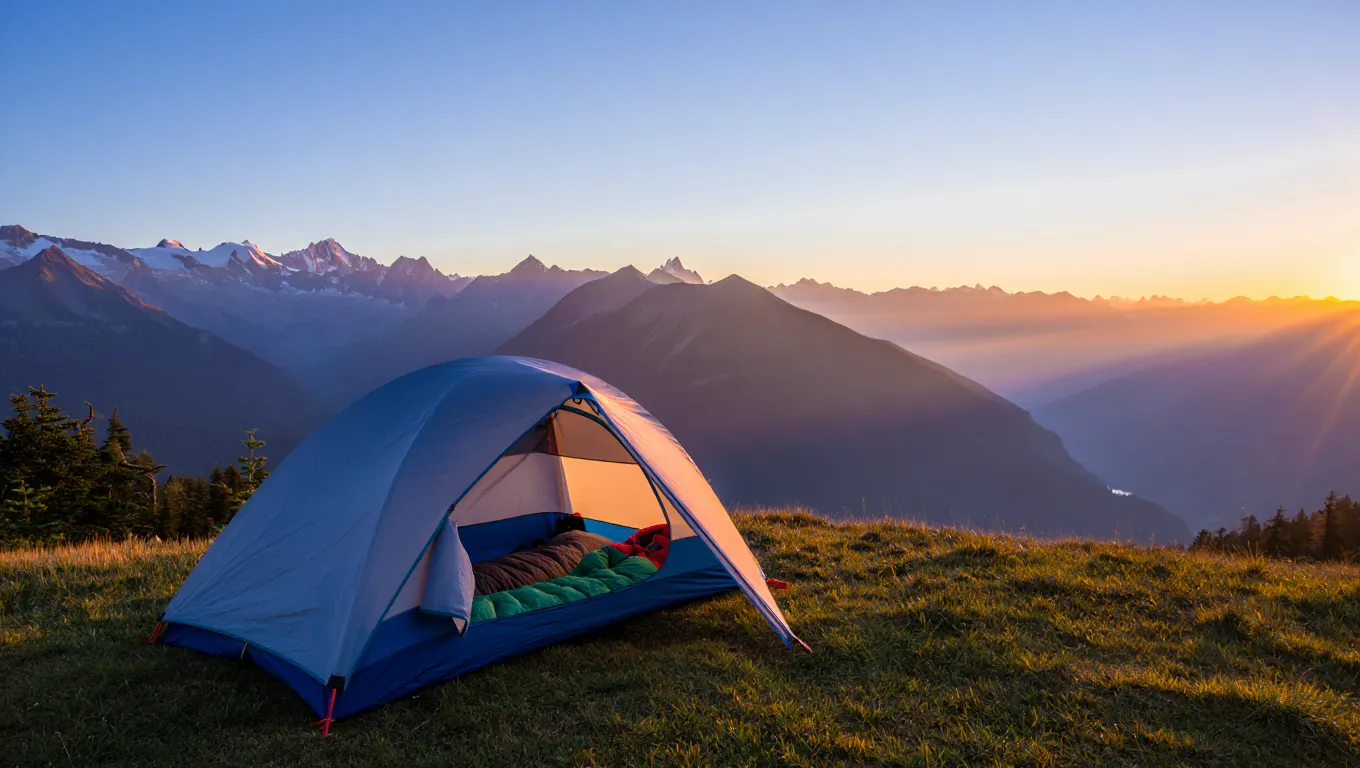
A backpacking sleep system is the collection of gear that keeps you warm, dry, and comfortable while sleeping outdoors. Unlike car camping where you might throw a thick sleeping bag in your trunk, backpackers need every component to be lightweight, packable, and efficient.
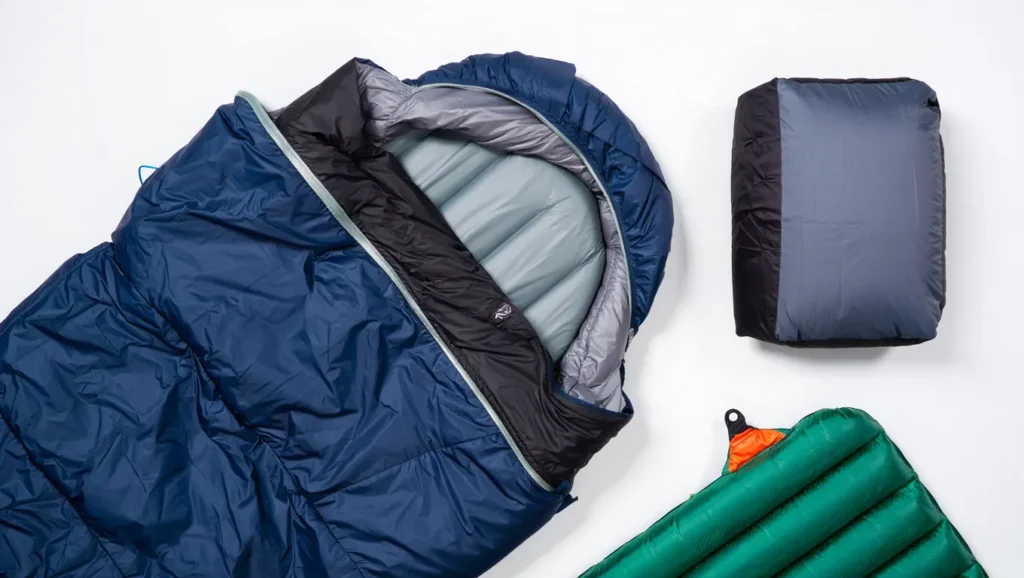
Your sleep system typically includes:
- Sleeping bag or quilt – Your primary insulation layer
- Sleeping pad – Provides cushioning and critical ground insulation
- Pillow (optional) – Improves comfort and sleep quality
These components must work as an integrated system. Your sleeping bag’s temperature rating assumes you’re using a sleeping pad with adequate insulation. A warm bag on a thin, cold pad equals a freezing night. Understanding this relationship is the foundation of building an effective system.
Why Your Sleep System Matters
Your sleeping gear typically represents 30-40% of your base pack weight – it’s one of the “Big Three” alongside your backpack and shelter. Beyond weight concerns, a poor sleep system can turn a dream backpacking trip into a survival ordeal. Chronic sleep deprivation affects judgment, increases injury risk, and drains the joy from every mile.
We’ve learned this the hard way through years of testing. During a spring trip in Colorado’s San Juan Mountains, inadequate ground insulation left us shivering despite 15-degree sleeping bags. The fix? Adding a simple foam pad underneath our air pads created a 20-degree warmth difference.
The Three Core Components
Sleeping Bag or Quilt
Your sleeping bag or quilt provides the insulation envelope that traps your body heat. Modern options use either down or synthetic insulation, each with distinct advantages.
Down Insulation:
- Superior warmth-to-weight ratio (up to 30% lighter)
- Highly compressible (fits in smaller stuff sacks)
- Longer lifespan with proper care (10-15 years)
- More expensive ($$)
- Performance drops when wet (though hydrophobic treatments help)
Synthetic Insulation:
- Maintains warmth when wet
- More affordable ($)
- Dries faster
- Bulkier and heavier
- Shorter lifespan (5-8 years)
Weight Target: For three-season backpacking, aim for 20-30 ounces for a sleeping bag, 16-24 ounces for a quilt. Winter bags will weigh 32-40+ ounces.
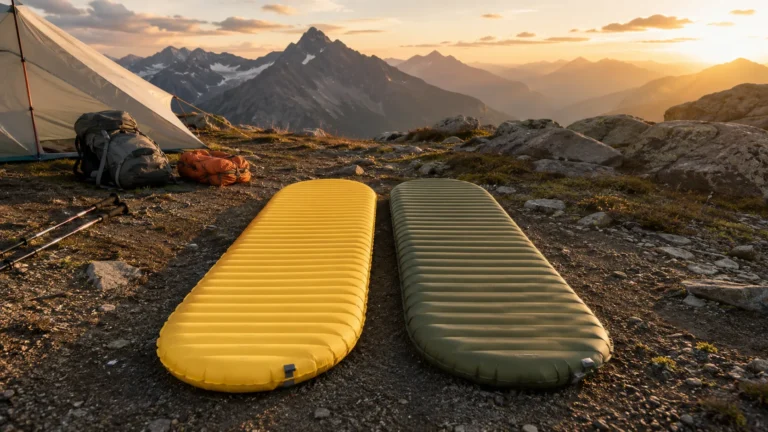
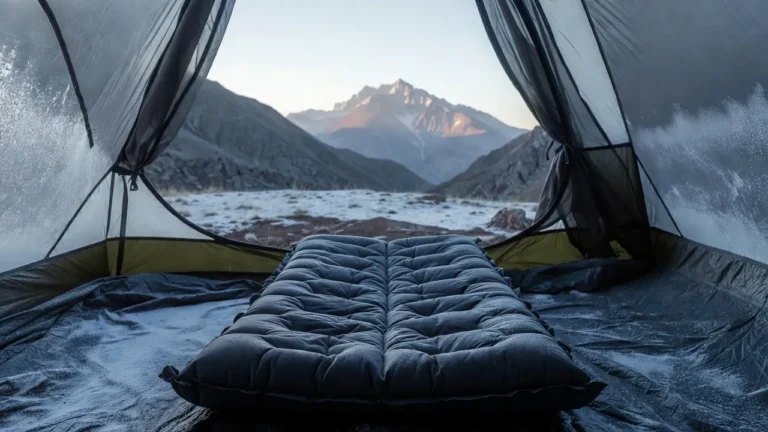
Sleeping Pad
Your sleeping pad serves two critical functions: comfort and insulation. Many beginners underestimate the insulation aspect – you can lose more body heat to the cold ground than to the air around you.
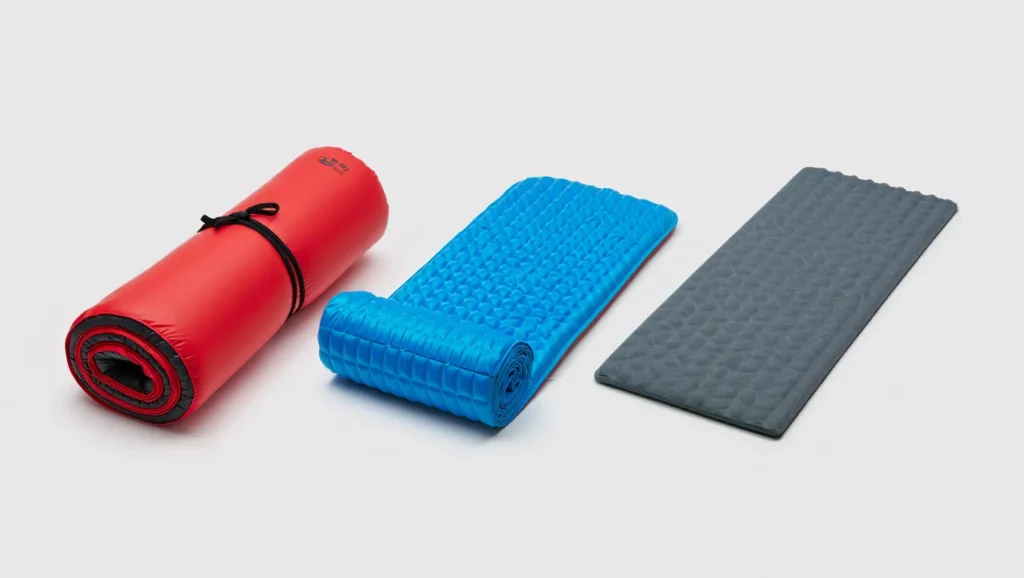
Pad Types:
Air Pads:
- Lightest option (12-20 oz)
- Pack smallest
- Most comfortable
- Risk of punctures
- Require inflation (2-3 minutes)
Self-Inflating Pads:
- Moderate weight (20-32 oz)
- Good comfort
- Easier to inflate
- Bulkier packed size
- More durable than pure air pads
Closed-Cell Foam:
- Indestructible
- No inflation needed
- Cheapest ($)
- Bulky (strap to pack exterior)
- Less comfortable for side sleepers
- Great as backup or base layer
Weight Target: 12-20 ounces for air pads, 14-16 ounces for foam pads.
Backpacking Pillow (Optional But Recommended)
A good pillow can dramatically improve sleep quality for just 2-4 ounces. Options range from inflatable pillows ($) to down-filled compressible pillows ($$) to the ultralight trick of stuffing your jacket into a stuff sack.
After testing dozens of options, we recommend investing in a proper inflatable pillow like the Sea to Summit Aeros. The 2.5-ounce weight penalty pays dividends in sleep quality, which compounds over multi-day trips.

Understanding Temperature Ratings & R-Values
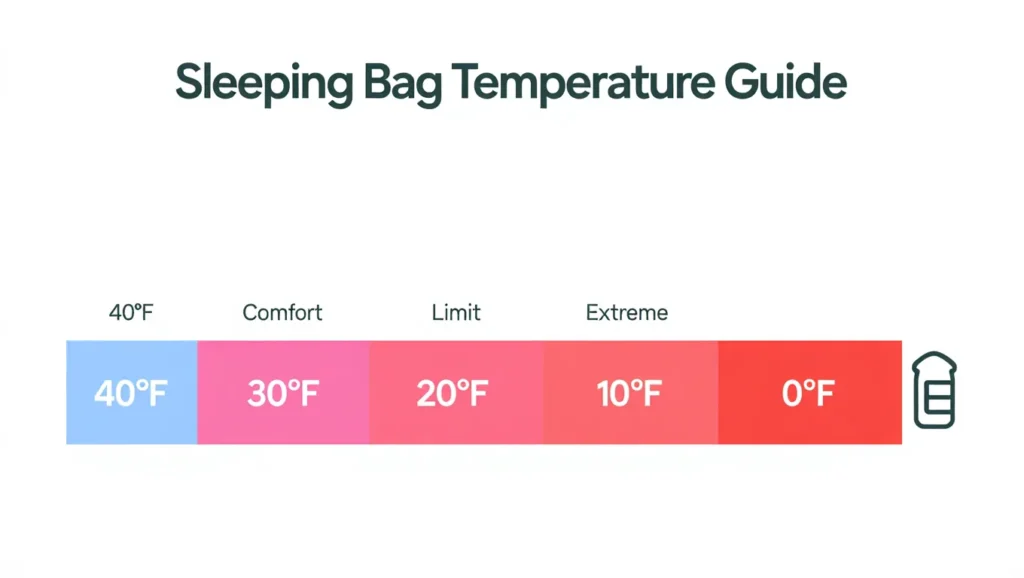
Sleeping Bag Temperature Ratings
Temperature ratings indicate the lowest temperature at which a sleeping bag keeps an average sleeper warm. However, these ratings come with important caveats:
EN/ISO Testing Standard:
- Comfort Rating: Temperature at which a cold sleeper remains comfortable
- Lower Limit: Temperature at which a warm sleeper stays comfortable
- Extreme Rating: Survival temperature (risk of hypothermia)
For women and cold sleepers: Choose bags rated 10-15°F colder than expected nighttime lows.
For men and warm sleepers: The lower limit rating usually works well.
Common Temperature Ranges:
- Summer (40-50°F bags): June-August in lower elevations
- Three-Season (15-30°F bags): Spring through fall in most conditions
- Winter (0-15°F bags): Late fall, winter, high-altitude year-round
Sleeping Pad R-Values
R-value measures a sleeping pad’s resistance to heat transfer – higher numbers mean better insulation. This standard was established in 2020 (ASTM F3340), making it easier to compare pads across brands.
R-Value Recommendations:
| Season | R-Value | Use Case |
|---|---|---|
| Summer | 1-2 | Warm nights, 50°F+ |
| Three-Season | 3-4 | Spring-Fall, 30-50°F |
| Cold Weather | 4-6 | Late Fall, 20-30°F |
| Winter | 6+ | Below 20°F |
Pro Tip: R-values are additive. Stacking a foam pad (R-2) under an air pad (R-3.2) gives you R-5.2 total – perfect for extending your system into colder seasons without buying new gear.

Sleeping Bags vs Quilts: Which Is Right for You?
The sleeping bag versus quilt debate divides the backpacking community. Here’s how to choose based on your priorities.
Choose a Sleeping Bag If:
- You’re a beginner – Bags are more straightforward to use
- You’re an active sleeper – Full-wrap design prevents drafts when you move
- You camp in very cold conditions – Hood and draft collar provide extra warmth
- You want maximum warmth – Complete insulation envelope
- You prefer simplicity – Just zip in and sleep
Best Sleeping Bags for Backpacking:
Budget Pick: REI Co-op Magma 15 – $$, 1 lb 9 oz
Great warmth-to-weight for the price, 650-fill down, fits most body types.
Premium Pick: Western Mountaineering UltraLite – $$$, 1 lb 5 oz
Best-in-class construction, 850-fill down, legendary durability, made in USA.
Choose a Quilt If:
- Weight is your priority – Save 4-8 ounces over equivalent bags
- You’re an experienced backpacker – Comfortable with pad attachment systems
- You sleep warm – Extra ventilation prevents overheating
- You use a wide pad – Quilts accommodate wider pads better
- You want versatility – Adjustable warmth by opening footbox
Best Backpacking Quilts:
Best Value: Enlightened Equipment Revelation – $$, 19.4 oz (20°F)
Highly customizable, proven design, excellent customer service, great warmth-to-weight.
Ultralight Pick: Katabatic Gear Palisade – $$$, 16.9 oz (30°F)
Premium materials, differential cut for cold prevention, perfect for gram counters.
Our Verdict: For most backpackers, we recommend starting with a sleeping bag. The learning curve is gentler, and modern bags aren’t significantly heavier than quilts in the same temperature range. Once you’ve logged 20+ nights and understand your sleep style, consider switching to a quilt if weight savings appeal to you.
Choosing the Right Sleeping Pad
Your sleeping pad choice involves balancing four factors: weight, warmth (R-value), comfort, and durability.
Our Top Picks by Category
Best Overall: Nemo Tensor All-Season – $, 1 lb, R-4.2
The sweet spot of comfort, warmth, and weight. Quiet fabric, stable feel, and warm enough for three-season use without winter bulk.
Best Budget: Big Agnes Rapide SL Insulated – $, 1 lb 5 oz, R-4.8
Outstanding warmth for the price. Slightly heavier but provides R-4.8 insulation that rivals pads twice its cost.
Ultralight Champion: Therm-a-Rest NeoAir XLite NXT – $$, 13 oz, R-4.5
The lightest insulated pad available. Slightly noisy but unbeatable for weight-conscious backpackers.
Winter Warrior: Therm-a-Rest NeoAir XTherm NXT – $%, 15 oz, R-7.3
Warmest inflatable pad made. Essential for winter camping or cold sleepers.
Foam Budget Option: Therm-a-Rest Z Lite Sol – $, 14 oz, R-2.6
Indestructible, no inflation needed, works great as a base layer under inflatable pads.
Pad Size Considerations
Length Options:
- Short (48-51″): Saves 2-4 oz, pair with backpack under feet
- Regular (72″): Standard choice for most users up to 6′
- Long (77-80″): For users over 6′ tall
Width Options:
- Standard (20″): Lightest, works for back sleepers
- Wide (25″): Better for side sleepers and those who move
- Extra-wide (30″): Maximum comfort, adds 4-6 oz
Comfort for Side Sleepers
If you’re a side sleeper, thickness matters more than for back sleepers. Look for pads 3+ inches thick to prevent “bottoming out” where your hip contacts the ground through compressed insulation. The Sea to Summit Ether Light XT at 4 inches provides luxury comfort for side sleepers without extreme weight (1 lb 4 oz).
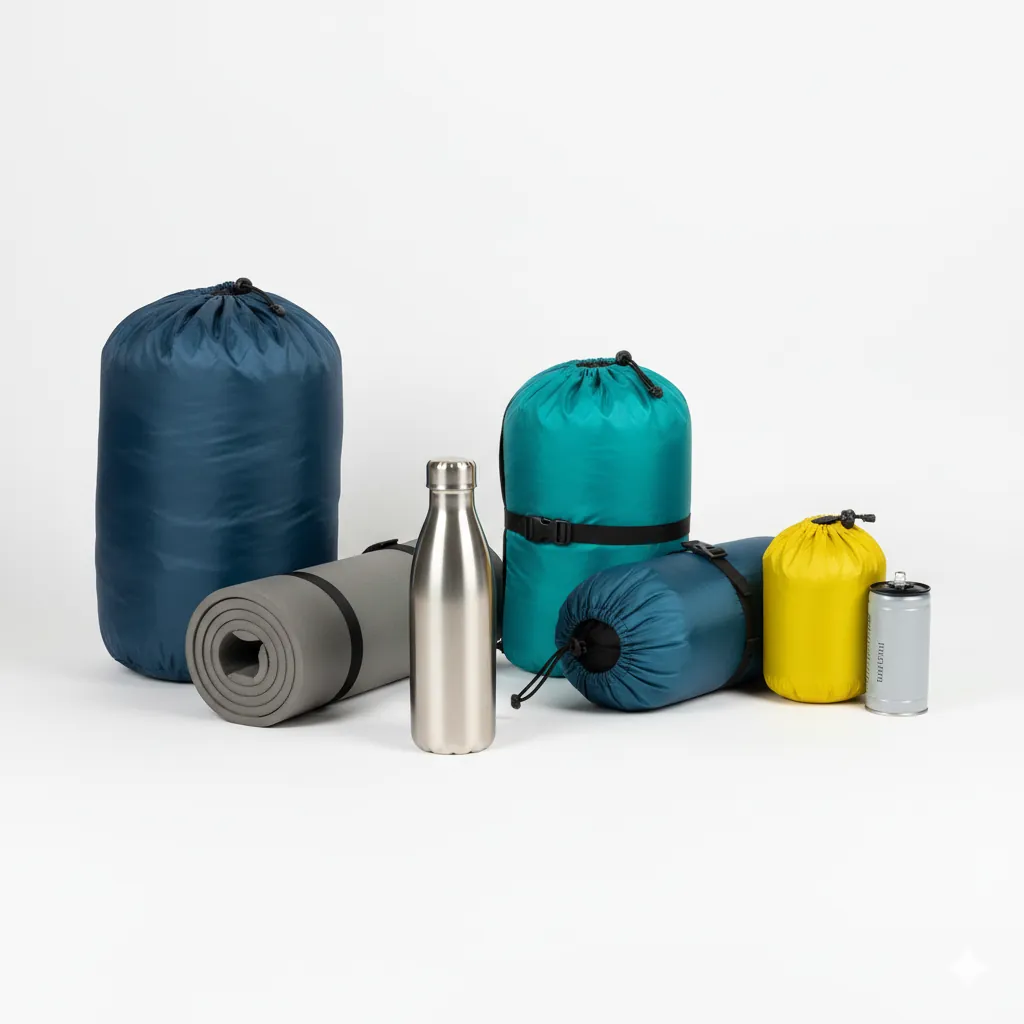
Complete System Examples by Season
Let’s put theory into practice with complete sleep system examples for different seasons.
Summer System (Above 40°F Nights)
Sleeping Bag/Quilt: 40-50°F rated, 16-22 oz
Example: Enlightened Equipment Revelation 40°F – $$$, 17.6 oz
Sleeping Pad: R-2 to R-3, 10-16 oz
Example: Therm-a-Rest NeoAir XLite (non-insulated) – $$, 11 oz
Pillow: Sea to Summit Aeros Ultralight – $, 2.1 oz
Total Weight: 29.7 oz (1.86 lbs)
Total Cost: $$
Use Case: June-August below treeline, desert spring/fall, warm coastal trails
Three-Season System (20-40°F Nights)
Sleeping Bag/Quilt: 20-30°F rated, 22-30 oz
Example: REI Co-op Magma 15 – $$, 25 oz
Sleeping Pad: R-3.5 to R-4.5, 14-18 oz
Example: Nemo Tensor All-Season – $, 16 oz
Pillow: Sea to Summit Aeros Premium – $, 3.2 oz
Total Weight: 44.2 oz (2.76 lbs)
Total Cost: $$$
Use Case: April-October in most mountain ranges, shoulder season camping, high-altitude summer
Winter System (Below 20°F Nights)
Sleeping Bag: 0-15°F rated, 32-40 oz
Example: Western Mountaineering Antelope MF – $$$$, 35 oz
Sleeping Pad: R-6+, 15-20 oz + foam backup
Primary: Therm-a-Rest NeoAir XTherm – $$, 15 oz
Backup/Base: Z Lite Sol Short – $, 10 oz
Pillow: Therm-a-Rest Compressible – $, 5 oz
Total Weight: 65 oz (4.06 lbs)
Total Cost: $$$
Use Case: November-March, high-altitude year-round, serious cold-weather camping
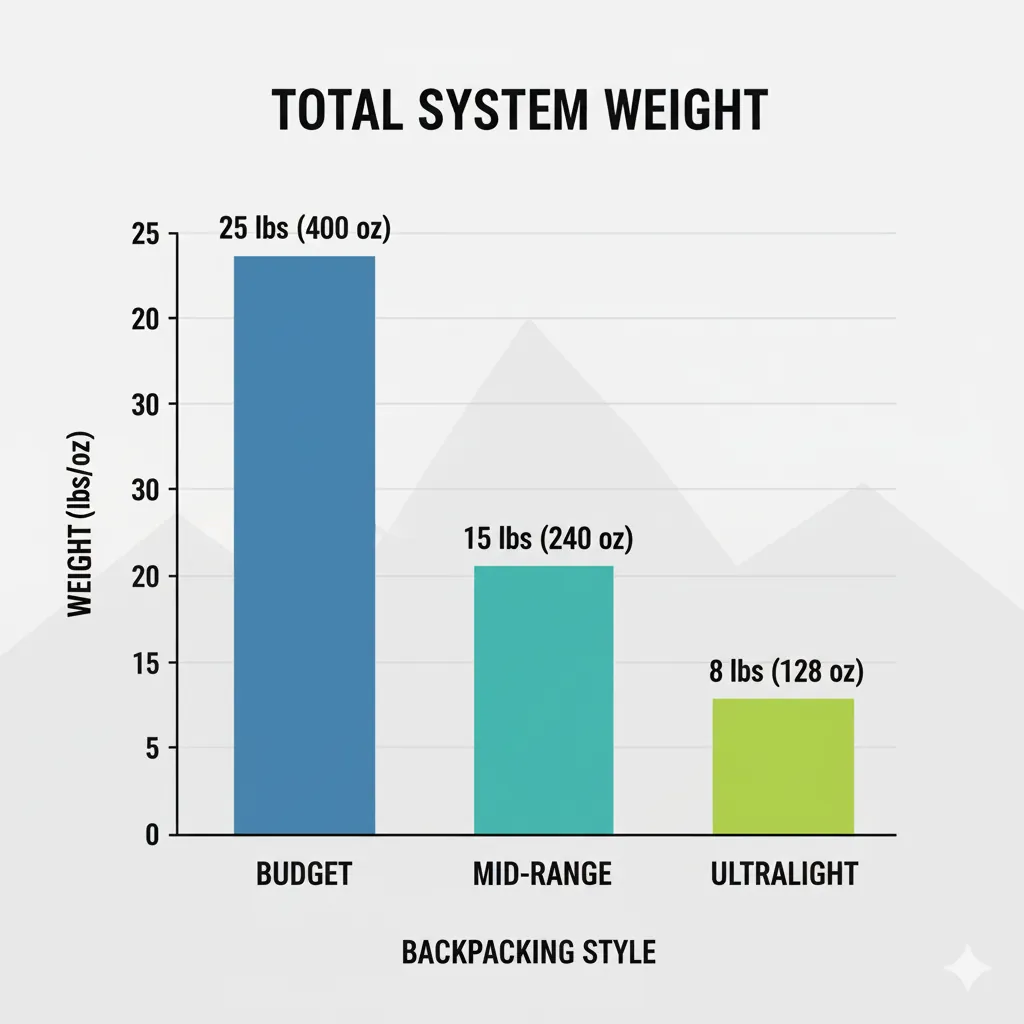
Budget Tiers: From $ to $$$+ Systems
Budget System: Low-Cost Setup
Sleeping Bag: Kelty Cosmic 20 – $, 2 lbs 4 oz
Sleeping Pad: Klymit Static V2 – $, 16.3 oz
Pillow: Stuff sack + jacket – $
Total Cost: $ (Ultra-affordable)
Tradeoffs: Heavier, bulkier, less durable. Perfect for trying backpacking before major investment.
Mid-Range System: $$ Total
Sleeping Bag: REI Co-op Magma 15 – $$, 25 oz
Sleeping Pad: Big Agnes Rapide SL Insulated – $%, 21 oz
Pillow: Nemo Fillo Elite – $, 3 oz
Total: $$, 49 oz (3.06 lbs)
Sweet Spot: Best balance of performance, weight, and cost. What we recommend for most serious backpackers.
Premium System: $$$+ Total
Quilt: Katabatic Gear Palisade 30°F – $$$, 16.9 oz
Sleeping Pad: Therm-a-Rest NeoAir XLite NXT – $$, 13 oz
Pillow: Sea to Summit Aeros Down – $, 2.8 oz
Total: $$, 32.7 oz (2.04 lbs)
Who It’s For: Ultralight enthusiasts, thru-hikers, frequent backpackers. Maximum performance, minimum weight.
How to Stay Warm: Pro Tips & Tricks
Beyond buying the right gear, these field-tested techniques maximize warmth:
Before Sleep
Eat a High-Calorie Snack – Your body generates heat digesting food. A handful of nuts or energy bar 30 minutes before bed works wonders.
Do Light Exercise – 20 jumping jacks or a short walk warms your core. Don’t overdo it and start sweating.
Warm Your Sleeping Bag – Boil water, fill a Nalgene bottle, and place it in your sleeping bag’s footbox 10 minutes before entering. This preheats your bag and keeps feet warm all night.
Pee Before Bed – Your body expends energy keeping liquid waste warm. Empty your bladder to redirect that heat where you need it.
Wear Dry Base Layers – Change out of sweaty hiking clothes into dry long underwear. Moisture conducts heat away from your body.
In Your Sleeping Bag
Use a Sleeping Bag Liner – Adds 5-15°F warmth for just 3-6 ounces. Sea to Summit Reactor liners use heat-reflective technology for maximum boost.
Wear a Beanie – You lose significant heat through your head. A lightweight beanie or buff adds warmth without weight.
Cinch the Hood – Close draft tubes and hood cinches to prevent warm air from escaping around your face and shoulders.
Sleep with Tomorrow’s Clothes – Put your base layers and socks inside your sleeping bag. They’ll be warm in the morning and provide extra insulation overnight.
Protect Electronics – Cold drains batteries. Sleep with phone, GPS, and camera batteries in your sleeping bag.
Site Selection Matters
Avoid Low Spots – Cold air sinks into valleys and depressions. Camp on slight rises when possible.
Natural Windbreaks – Trees and terrain features block wind, which dramatically affects perceived temperature.
Insulation Underneath – Place your closed-cell foam pad, your backpack, or extra clothing under your sleeping pad for additional ground insulation.
Common Sleep Problems & Solutions
Problem: Cold Hips and Back
Cause: Inadequate ground insulation. Your sleeping pad’s R-value is too low or you’re “bottoming out.”
Solution:
- Add a foam pad under your air pad (R-values stack)
- Upgrade to a higher R-value pad
- Choose a thicker pad (3.5″+ for side sleepers)
- Place your backpack or extra clothing under your pad
Problem: Cold Feet
Cause: Poor circulation or moisture buildup.
Solution:
- Warm water bottle in footbox before sleep
- Wear dry wool socks (not cotton)
- Loosen laces if wearing socks with elastic
- Do 30 seconds of foot flexing before sleep to improve circulation
Problem: Waking Up with Sore Shoulders/Hips
Cause: Insufficient cushioning for your sleep position.
Solution:
- Side sleepers need 3″+ thick pads
- Try a wider pad (25″ instead of 20″)
- Slightly deflate pad for more conforming comfort
- Upgrade pad (Nemo Tensor or Sea to Summit Ether Light)
Problem: Getting Cold During the Night
Cause: Heat loss through pad compression, drafts, or inadequate insulation.
Solution:
- Wear more layers (don’t sleep naked to “warm the bag”)
- Add a sleeping bag liner
- Eat a snack to restart your metabolic furnace
- Check for drafts around hood, zipper, footbox
- Ensure sleeping pad hasn’t shifted or deflated
Problem: Too Hot, Can’t Sleep
Cause: Bag rating too warm for conditions or poor ventilation.
Solution:
- Open vents and loosen zippers before overheating starts
- Consider a quilt for better temperature regulation
- Remove layers before getting sweaty
- Use just a sleeping bag liner in warmer conditions
Problem: Sleeping Pad Keeps Deflating
Cause: Puncture, valve issue, or temperature-related pressure changes.
Solution:
- Carry a repair kit (always)
- Check valve is properly closed
- Submerge pad in water to find puncture (bubbles indicate leak)
- Apply patch per manufacturer instructions
- Consider foam pad as backup for multi-day trips
Frequently Asked Questions
What is a backpacking sleep system?
A backpacking sleep system is the collection of gear that works together to keep you warm and comfortable while sleeping outdoors. It typically includes a sleeping bag or quilt, sleeping pad, and pillow. These components must complement each other- your sleeping bag’s temperature rating assumes you’re using an appropriate sleeping pad with adequate insulation.
How much should a backpacking sleep system weigh?
An ideal lightweight backpacking sleep system weighs 3-4 pounds total. This typically breaks down to 2-3 pounds for your sleeping bag or quilt and 1-1.5 pounds for your sleeping pad. Ultralight enthusiasts can push this below 2.5 pounds, while those prioritizing comfort might accept 5-6 pounds.
What’s the difference between a sleeping bag and a quilt for backpacking?
Quilts are lighter because they eliminate the back insulation and hood that sleeping bags have. They attach to your sleeping pad and provide warmth on top and sides. Quilts offer more ventilation in warm weather and save 4-8 ounces compared to equivalent sleeping bags. However, sleeping bags provide better all-around insulation and are easier for beginners to use.
What R-value sleeping pad do I need for backpacking?
For three-season backpacking, aim for an R-value of 3-4. Summer camping works with R-values of 2-3, while winter camping requires R-values of 5 or higher. R-value measures insulation from cold ground – higher numbers mean more warmth. Your sleeping pad’s insulation is just as important as your sleeping bag’s temperature rating.
Should I choose down or synthetic insulation for backpacking?
Down offers the best warmth-to-weight ratio and compressibility, making it ideal for dry conditions and weight-conscious backpackers. Synthetic insulation performs better when wet and costs less but weighs more and packs larger. Many modern down products use hydrophobic treatments to resist moisture. Choose down for most conditions, synthetic for consistently wet environments or budget constraints.
How do I know what temperature rating sleeping bag to buy?
Choose a bag rated 10-15°F colder than the lowest temperatures you expect to encounter. For three-season backpacking, a 20°F bag handles most conditions. Women and cold sleepers should go even warmer. A 15°F bag with ventilation options provides more versatility than a 30°F bag that leaves you shivering on cold nights.
Can I use a camping sleeping bag for backpacking?
You can, but car camping bags typically weigh 3-5 pounds and pack much larger than backpacking-specific bags. This extra weight significantly impacts your hiking comfort. If you’re just trying backpacking once, a camping bag works fine. For regular backpacking trips, invest in a proper backpacking sleeping bag that weighs 2-3 pounds and compresses smaller.
Do I really need a sleeping pad for backpacking?
Absolutely yes. A sleeping pad isn’t just for comfort – it provides critical insulation from cold ground. You lose more heat to the ground than to surrounding air. Even with a warm sleeping bag, sleeping directly on the ground will leave you dangerously cold. A sleeping pad is a non-negotiable safety item for any season.
Final Recommendations
After testing countless sleep systems across hundreds of trail nights, here’s our ultimate advice for building your perfect backpacking sleep system.
For Most Backpackers: The Versatile Three-Season Setup
Our Top Pick: REI Co-op Magma 15 Sleeping Bag + Nemo Tensor All-Season Pad
This combination delivers exceptional warmth, comfort, and versatility for $. The Magma 15 handles everything from summer alpine nights to cool spring/fall conditions. Paired with the Tensor’s R-4.2 insulation and excellent side-sleeper comfort, you’ve got a system that works for 90% of backpacking trips.
Total Weight: 2.6 pounds
Temperature Range: Comfortable to 20°F, survivable to 10°F
Best For: Weekend warriors to serious backpackers
For Ultralight Enthusiasts: Maximum Performance, Minimum Weight
Our Top Pick: Enlightened Equipment Revelation 20°F Quilt + Therm-a-Rest NeoAir XLite NXT
Shave nearly a pound off your pack weight without sacrificing warmth. The Revelation quilt offers incredible versatility with adjustable ventilation, while the XLite remains the gold standard for ultralight insulated pads.
Total Weight: 2.1 pounds
Cost: $
Best For: Experienced backpackers, thru-hikers, gram counters
For Budget-Conscious Beginners: Get Started Without Breaking the Bank
Our Top Pick: Kelty Cosmic 20 + Big Agnes Rapide SL Insulated
Don’t let budget prevent you from getting outside. This system delivers solid three-season performance for under $$. Yes, it’s heavier than premium options, but it keeps you warm and comfortable while you decide if backpacking is your passion.
Total Weight: 3.4 pounds
Cost: $
Best For: First-time backpackers, casual campers
For Winter Warriors: Serious Cold-Weather Capability
Our Top Pick: Western Mountaineering Antelope MF 5°F + Therm-a-Rest NeoAir XTherm NXT + Z Lite Sol Backup
Winter camping demands no compromises. This system keeps you warm in extreme conditions with the reliability needed for serious cold-weather adventures. The dual-pad system provides R-9+ total insulation.
Total Weight: 4.1 pounds
Cost: $$$
Best For: Winter campers, high-altitude mountaineering, extreme conditions
Your Next Steps
Building the perfect backpacking sleep system doesn’t happen overnight. Start with the season you’ll camp most often, invest in quality core components, and upgrade strategically over time.
Immediate Actions:
- Determine your primary season – What temperatures will you encounter most often?
- Set your budget – What can you invest now versus later?
- Consider your sleep style – Side sleeper? Cold sleeper? Active sleeper?
- Start with sleeping pad and bag – These are your core investments
- Test before big trips – Sleep in your backyard first
Build Your Complete Backcountry Kit:
Want to dial in your entire gear system? Check out our comprehensive guides:
- Best Backpacking Tents: Ultralight to Bomber Options – Find the perfect shelter to complement your sleep system
- Complete Backpacking Gear Checklist – Never forget critical items again
- Layering Systems for Backpacking – Stay comfortable from trailhead to camp
- Best Backpacking Sleeping Bags Reviewed – Deep dives on specific bag models
A Final Word from the Trail
Your sleep system is the foundation of enjoyable backpacking. We’ve suffered through too many cold, uncomfortable nights to let you make the same mistakes. The difference between a system chosen randomly and one carefully matched to your needs is the difference between dreading sunset and eagerly anticipating stargazing from your cozy sleeping bag.
Invest in quality sleep gear first – before the GPS watch, before the titanium cookware, before the latest ultralight shelter. Because every great trail day starts with a restorative night’s sleep.
Now get out there and enjoy those warm, comfortable nights under the stars. The mountains are waiting.
Happy trails!
Last Updated: November 14, 2025